 Real-Time Media Conductor
Build · Get started
Create a room and publish events
Create a room, invite a client, and deliver two independent event streams over one WebSocket. No provider credentials needed.
By the end, you will have published a chat message and a work result, received them in two independent subscriptions, and verified that retrying the same publication does not append another event. The executable example closes its room when it finishes.
Prepare the repository
You need Go 1.26 and Node.js 22.13 or newer, as specified in go.mod and package.json. Run the commands from a checkout of this repository. No LiveKit, OpenAI, browser microphone, or reasoner is needed.
npm ci
npm run build --workspace @rmc/client
@rmc/client resolves through the repository's npm workspace. It is currently private; installing it from the public npm registry is not part of this setup. See using the SDK from another repository.
Start an isolated local API
In the first terminal, run:
RMC_ADDR=127.0.0.1:8088 \
RMC_DATABASE=/tmp/rmc-docs-quickstart.db \
RMC_ADMIN_TOKEN=local-docs-only \
RMC_DISABLE_OPENAI_RESPONSES=1 \
RMC_DISABLE_OPENAI_REALTIME=1 \
LIVEKIT_URL= LIVEKIT_API_KEY= LIVEKIT_API_SECRET= \
go run ./cmd/rmc-server
Port 8088 keeps this tutorial separate from the full demo's default 8080. The explicit provider overrides keep this exercise local, even if your checkout has a provider key in its ignored .env. The admin token shown here is only for this loopback tutorial. Your deployed backend needs its own secret.
The server always registers the deterministic adapter. It can run without external services. The SQLite file holds the room journal between server runs.
Run the client
In a second terminal, from the repository root:
RMC_URL=http://127.0.0.1:8088 \
RMC_ADMIN_TOKEN=local-docs-only \
node docs/examples/quickstart.mjs
The script uses the owner credential only to provision channels and invite a scoped participant. It then uses that participant for the client path. In a product, these two parts live on opposite sides of your backend boundary.
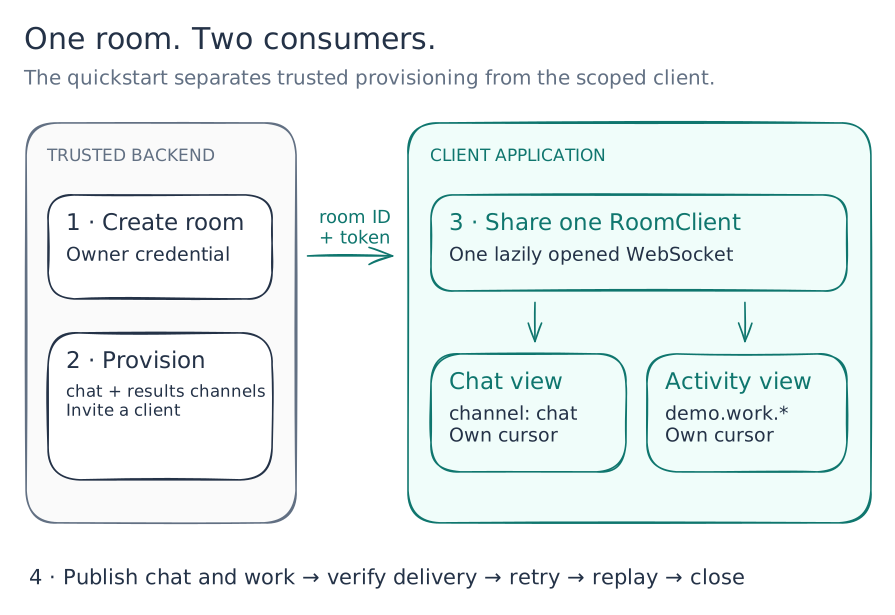
The client API portion is:
const chat = room.channel("chat");
const messages = chat.subscribe({onEvent: showMessage});
await chat.publish("text.message.committed", {text: "Hello, room."});
Here, room is the scoped handle created during setup. showMessage is your
application callback. Close messages when its view ends.
Download the complete runnable example. It includes provisioning, the second subscription, retry and replay assertions, and cleanup.
Recognize success
The script prints:
PASS two subscriptions received their selected events
PASS retry returned the original event
PASS replay resumed after the supplied cursor
PASS room closed
Event sequence numbers and room IDs vary. The assertions use returned event identities, not hard-coded sequence positions: room setup also produces durable records.
The initial subscriptions begin at afterSeq: 0. They therefore see matching history even if the first publication commits before their stream handshake finishes. The same mechanism handles replay and live delivery; you do not need to race an HTTP history fetch against a WebSocket connection.
Change the subscription filters
Change the activity subscription to select both channelIds: ["results"] and eventTypes: ["demo.work.*"]. It still receives the work event because both dimensions match. Change its channel ID to chat and it receives no work events: dimensions combine with AND.
Then remove the participant's event:publish grant on results. Its result publication is rejected even though it still has read access. A selector chooses what to receive; it never grants permission.
Next, read the room model, then delivery and cursors. For a browser integration, follow the TypeScript client guide instead of placing this provisioning script in frontend code.